DIY Painted Flower Pot

So today let’s paint a flower pot! This is super easy, these instructions are my own idea, I got inspired by a photo on Pinterest where you use a pressure washer for the distressed rustic look, but I have found a much simpler way to achieve the look! So here goes:

You Will Need:

A Clay Terracotta Pot

Steel Wool

Acrylic Paint (color of your choice, I used Ceramcoat brand in the color Caribbean Blue )

Twine/Thin Rope

ModPodge  (I used matte, use any kind you want)

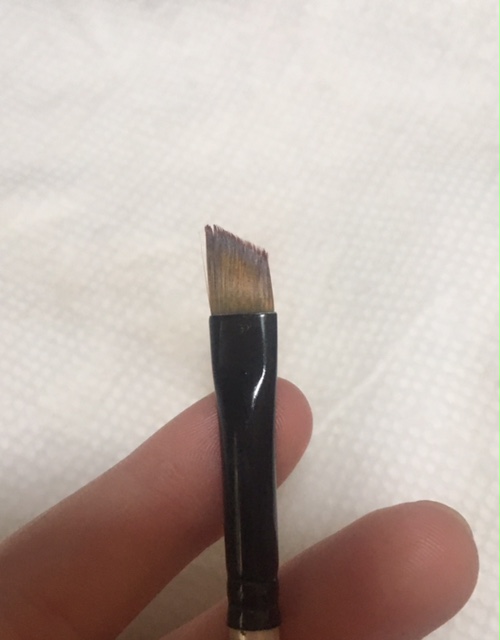
A Paint Brush (I used a 3/4″ stroke brush)

Instructions:

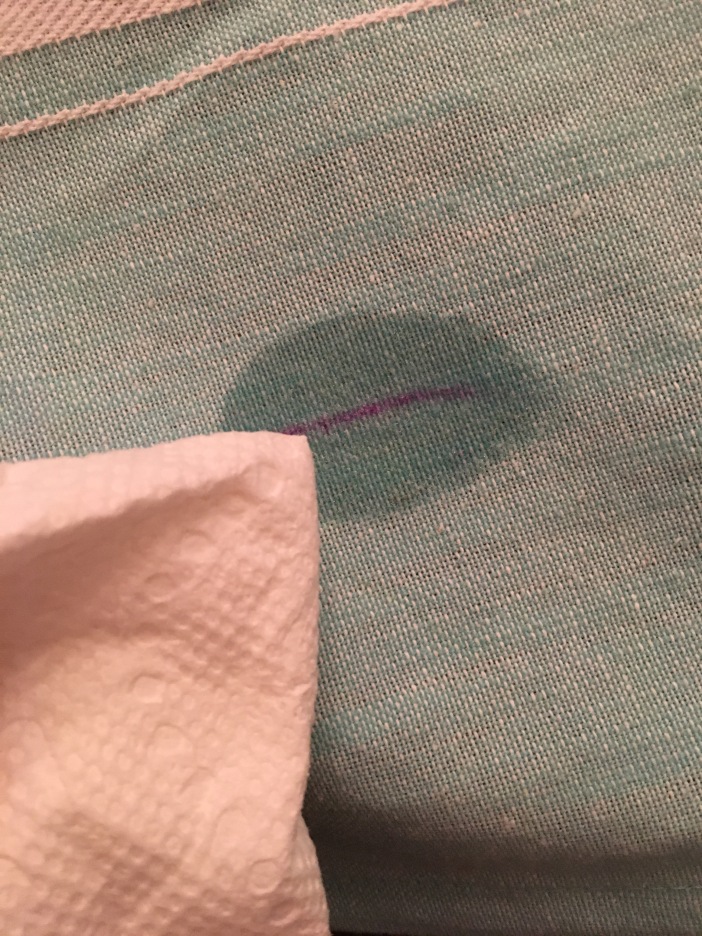
First what we’re going to do is take our steel wool and our terracotta pot an using the steel wool rub the clay pot till you see a fairly substantial grey  mark. Do this all the way around your pot, this gets your pot sanded and starts our rustic old look.

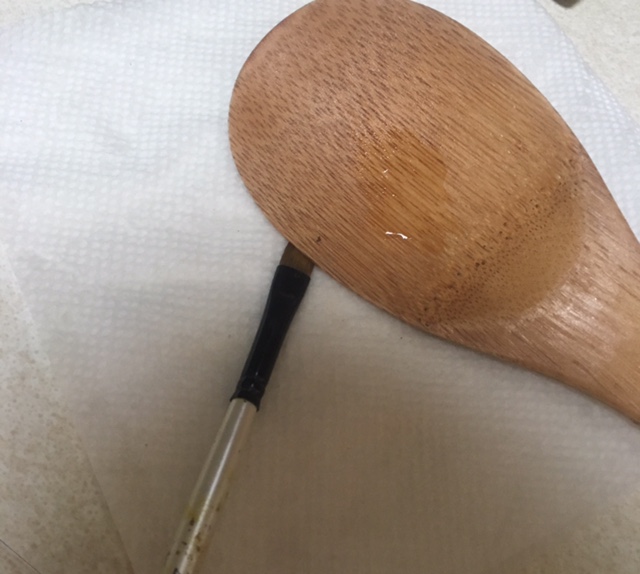
Now we can get our paint out! No paint brush required though, we use our steel wool. Acting like the steel wool is a paint brush, pick up some paint from your palette and rub over the pot. Don’t worry much about using too much paint, you can smooth it out once it’s on the pot. Once you have done  that all around the pot and like how it looks, let the paint dry. It should look similar to this:IMG_0253 (1)

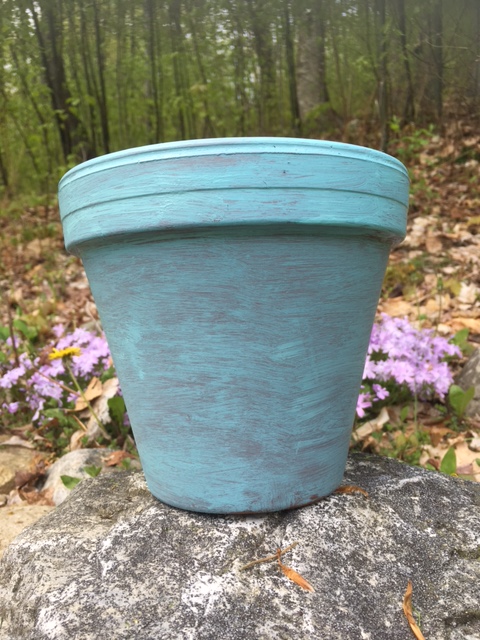
Now we use our paint brush and modpodge. Open up the can of modpodge and lay a thick coat onto the pot. DO NOT skip this step. The modpodge ensures that the paint won’t rinse off or bubble while it rains or you’re watering the flower. I did 2 thick coats of modpodge to make sure it is water resistant. The modpodge should dry within 5 minutes.

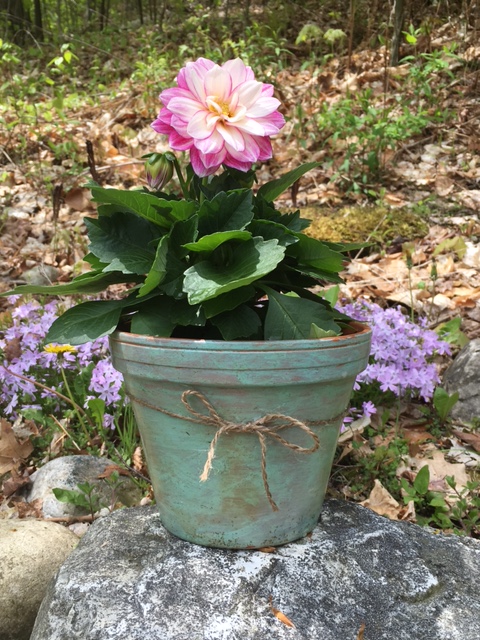
Last but so not least we will use our twine, our paint brush, and some modpodge (this step is optional). Cut a long piece of twine (big enough to go around the top of the pot with room for a bow) and modpodge the twine onto the pot. Use as much modpodge as you need to steadily get it around the pot. Now just tie a bow with the twine, you can make the bow as big as you like. Once this is fully dry, test that it is water resistant by filling a watering can with water and lightly pouring it onto the pot. If there are no bubbles or pealing, your safe! Now all you need to do is plant the lucky flower into your gorgeous pot. Here’s my finished project:

IMG_0255

Thanks for reading, please post your finished product or share your thoughts or questions in the comment section below.

Yours Truly, The Blue Eyed Crafter

5 Space Saving Tips for Traveling!

Traveling season will soon be among us! I thought I would share some of my favorite traveling tips for saving space and being organized on the go. Let’s get started:

Tip #1: Storing Hair Ties

FE7A1DF3-18BD-4F60-BE13-CBA378832E3C.jpeg

Hair ties somehow end up scattered across everything… hotels, beds, luggage, so to have this hair tie tip is truly a life saver to me! Simply use a carabiner to keep missing hair ties at bay.

Tip #2: Storing Your Necklace

E9E9CBF2-6C16-4C11-B56C-89FE5322C65D.jpeg

Once again I have dealt with tangled necklaces and trying to undo knots on necklaces a lot. Sometimes I would even end up ruining a necklace cause the knot was so large and so very tight! This simple hack is a lifesaver. All you need is a drinking straw. Thread one side of your necklace chain through the tube of the straw, and once through clasp the necklace ends together. This creates no slack on the chain to get tangled and potentially create a knot.

Tip #3: Using Ziploc Bags to Organize Clothing

This hack is great for packing little kids luggage, as well as summer luggage. I particularly love this tip for camping, because I won’t get my dirty clothes and my clean clothes mixed even if I store them in the same bag. My clothes aren’t damp, and they are perfectly organized so each day I don’t have to create an outfit or look for clothes to match. It’s already there and ready! All you need to do is take a large plastic bag and roll each days clothing into it. Once this is done, squeeze, squeeze, squeeze the bag letting all the air out and quickly zip it. This maximizes space too!

Tip #4: Store Loose Cords 

Oh no. Oh no. No, no, no!! Your phone is on 1%! You rummage through your bag to find your phone charger wrapped around three different things. Whilst untangling the mess, your phone dies. OR: oh no. No, no, no!! You reach into your bag. Quickly grabbing the glasses case, opening it to find your cord, plug in your phone and you are saved. Which one would you rather live? I’m thinking the second example. Keep your charging cords tidy by plopping them in a sunglasses case! This keeps the cords tangle free and easy access for all of your low battery catastrophes.

Tip #5: Storing Earrings

7FCC0A84-CD7B-4C2D-9026-5A57373A4D51

Lost earrings are a recurring trouble that I often deal with but not in my travels!! With this easy hack you simply use a button! Take any button with two holes and put your earring hook or post through. They stay together and you can use giant buttons so they don’t get lost in the bottom of a bag. I love this hack.

Thanks for reading my top five traveling tips and I hope these help you keep organized next vacation. Please like and comment on this post if you enjoyed it or have any questions!

Sincerely, The Blue Eyed Crafter


How to Get Ink Out of Fabric

An inky pocket is such a nightmare. How do I get it out? How did this happen? Can I get it out?? Yes! It’s very easy to get ink out of any type of fabric, or even a hard surface like a counter top. All you need is this easy tutorial!

Supplies Needed

a Cloth (such as a paper towel)

Hairspray (don’t worry about buying a nice brand unless you already have one, the cheapest brands will have just what we need!)

How To Do It:

First you will locate the stain and collect all the supplies. Once everything is rounded up, we can begin!

IMG_3841

Simply spray the stain with a good wet blob of hairspray. You will begin seeing the ink get more pigmented, what that means is the stain that had absorbed into the fabric is now getting lifted out. See pictures below for emphasis.

Before the hairspray dries take your towel and rub vigorously (you can also try blotting, but I find that the rubbing back and forth urges the stain to extract more so!)  once you have done this for a minute you may notice some lifting, but it’s not entirely removing. This is very usual especially with older stains. But don’t worry, you can still remove it! For the stain pictured it took about 3 repetitions of step one and step two.

IMG_3845

Once the stain is fully removed, you can dampen your cloth with warm water so the fabric or counter does not stiffen (or get sticky in the counter’s case) with hairspray. Just rub the wet cloth against the surface and the hairspray will begin to be less stiff. See third picture to the right above for emphasis.

I recommend to wash the garment before wearing it. There will be no signs of hair spray on the darker fabric since we dabbed water to take it out.

I hope this helped your fabric/counter top stain! Please like this post and share it with your friends to see more posts like this one. Thanks for reading!

IMG_3849.JPG


Day 1: 12 Days of Christmas: Gift Guide for The Knitter!

In past Christmases it has been difficult to find that perfect gift, that you know is out there. So today, to kick off the 12 days of Christmas fun, let’s start out with the ultimate gift guide for the knitter!

1: Knitter’s Pride Interchangeable Circular Needles

These are too nice! They truly are a knitter’a pride. Coming in a nice bag that is meant to truly last, these needles are quick and easy to interchange with a screw on system. The full set is sizes US 4 to US 11. Coming with 24″, 36″, 40″, and more cable sizes. I have broken these needles before, and they aren’t easy to break, but when they are broken you can buy replacement of just that size needle for around $7.

2: Knitter’s Pride Marblz Double Pointed Needle Set

Ranging from US 4 to US 10 these needles are easy to see the knitting with their bright colors, as well as fun to knit with. They are plastic, yet very smooth and not easily bendable although it can bend. These also have a very nice case, including a zipper and easy storage that isn’t bulky. They also have replacement needles where you can only buy one size if you aren’t ready to commit to the entire set.

3: Malabrigo Worsted Merino Yarn

Over 200 yards of worsted weight super soft 100% merino wool, this yarn is easy to knit with and even easier to buy with the good price of $12. Rangeing from many great colors from solid to the wildest multi colors, this yarn is perfect.

4: Debbie Bliss Roma Yarn

A new love for me, this is for the true wool lover. Soft, yet very warm this yarn is nice and bulky to make the perfect quick knit. 100 grams for $16 can make a beanie, and more! This yarn comes in several nice solid colors including charcoal a nice grey, dark turquoise/teal, beige/light brown and dark brown.

5: The Knit Kit

This is one of my favorites. The knit kit from Martha Stewart’s Crafts is simply a life saver. A measuring tape of 60″, needle gauge, scissors, yarn needle, stitch markers, yarn cutter, counter, and crochet hooks all in one amazing kit that is small and compact! This plastic kit is $25 and a real keeper.

If you have any questions or comments please leave your thoughts down below. If you enjoyed this post, please like and share with your friends. Thanks for reading.

Yours Truly, The Blue Eyed Crafter

How To: Get Nail Polish Off Quickly and Easily with This Quick Tip!

There’s nothing worse than smudging the perfect nail. Then, to remove the perfect nail you smudge all the other nails with the nail polish remover. It’s an endless cycle of annoyance. You’re telling me… this doesn’t have to happen? Yes! With this quick and easy tip that nightmare can go away for good. Ready?

img_1338

Supplies & Tools Needed

a Mason Jar with Lid (preferably not wide mouth)

Nail Polish Remover

a Sponge (or as many as you need to go all the way around the jar, keep in mind when the sponge is wet it is larger)

How It’s Done

As far as instructions go this is a 5 minute project for sure. First you’ll fit the sponge or sponges into the jar in order for them to go all the way around, the nail will rub on this to get the nail polish off entirely when in use.

Secondly, all you have to do is drizzle the nail polish remover over the sponge and jar. Make sure the sponge is evenly soaked as well as the jar.

For storage, screw the lid on tight and add some more nail polish remover to it if it’s dry when in use. I’ve had mine for about a month and it’s still as wet as when I first made it. Shake before use.

For use, just put the ugly nail in, rub slightly on the wet sponge and a plain, gorgeous nail comes out! No mess, no hassle, just a pretty ol’ nail.

If you have any questions or comments, please leave your thoughts in the comment section below. If you enjoyed this post, please like and share with your friends. Thanks for reading!

Yours Truly, The Blue Eyed Crafter

How To: Reincarnate Old, Split Paint Brushes Easily!

Wouldn’t you love to save your favorite brush from being split, and unusable? Wait, you’re telling me I can?? Yes. With this super simple trick your $30 brushes can become brand new again. What happens when a brush is heavily used, is that the bristles start to move away from each other instead of hugging each other like they should. Well what you didn’t know is that you can stop these rebellious bristles. Are you ready to rejuvenate those brushes?

img_1309

Supplies Needed:

A Small Pot (about half full of water)

A Large Spoon

A Paper Towel

The Damaged Brush

An Oven

Let’s Do It

Step Fill your pot about half full of water, and start the stove. It will take a few minutes to boil, but don’t let it boil very long, or your water might start boiling away.

Step While you’re waiting for the water to boil, get your large spoon and a paper towel. Lay the doubled paper towel on your work surface,  with the spoon near by, ready to be used.

Step Once the water has come to a nice, bubbling boil dip the brush in. Do NOT put it in too deep, for instance do not go over the ferrule (the metal part) of the brush and to the handle. Once the brush has been dipped, lay it on the paper towel and quickly press the bristles together with the back of the spoon. Dip the brush and press a few more times, until the hairs are together again.

fullsizerender-32


fullsizerender-33

fullsizerender-34

An there is the perfect brush! If you enjoyed this post, please like and share with your friends. If you have any questions or comments please state your thoughts in the comment section below.

Yours Truly, The Blue Eyed Crafter

3 Ways You Can Get to Sleep Faster Using Essential Oils!

We all have those sleepless nights. Getting to sleep can be extremely difficult, and counting sheep tends not to help, not near as much as these 3 simple sprays, in three simple ways. You can spritz, rub, or diffuse these awesome recipes for a night where you’ll be snoring before you hit the pillow. Ready?

Supplies Needed:

Method No. 1 Spritz

A Dark Glass Spray Bottle (the cobalt blue ones are adorable, and 2 oz is a great size)

Essential Oils from recipe of your choice.

Distilled Water

Method No. 2 Rub

Distilled Water

Dark Glass Roll On Bottle (the cobalt blue shaded glass is great, 1-.5 oz is a great size)

Essential Oils from recipe of your choice.

Method No. 3  Diffuse

an Essential Oil Diffuser (the recipe is made for 100 ml of water)

Water

Essential Oils for recipe of your choice.

Method No. 1 Spritz: How to Make

First, your going to fill up the glass spray bottle with distilled water to about as full as you’d like. Now add the essential oil recipe of your choice, make sure to do the spray bottle amount, or else the scent could be too weak or too strong. Shake bottle well, with cap screwed on tight. Mist spray wherever you’d like, recommended areas are the pillow, bedroom, and bed.

Method No. 2 Rub: How to Make

First, you’re going to start with the glass roll on bottle. Fill it up with distilled water, as full as you’d like the finished product to be. Now add in the essential oils of your choice, following the recipe as closely as possible and making sure to do the roll on amount, or else the scent may be too weak or strong. Cap bottle, putting the roll on ball cap on tightly, I use an old mouse pad to push it in firmly. Best areas to apply are temples, back of neck, forehead, and between eyebrows. If you have sensitive eyes don’t apply close to them, and you may want to put less drops of essential oils in. Back of neck is best if you are afraid of burning your eyes.

Method No. 3 Diffuse: How to Make

First, fill clean diffuser with water. Now drop in recommended amount of essential oils for your choice of recipe, making sure to use the diffuser amount or else the scent may be too strong or too weak. Put lid of diffuser on, and place close to bed.

Essential Oil Recipe No. 1: Cool an Refreshing Relaxation

This recipe is perfect for a refreshing, relaxing night.

Method No. 1 amount: 4 drops Lavender, 4 drops Peppermint.

Method No. 2 amount: 2 drops Lavender, 2 drops Peppermint.

Method No. 3 amount: 4-5 drops Lavender, 4-5 drops Peppermint.

Essential Oil recipe No. 2: Fall Night

This recipe is perfect for a warm, autumn night.

Method No. 1 amount: 3 drops Orange, 2 drops Clove, 2 drops Lavender.

Method No. 2 amount: 2 drops Orange, 1 drop Clove, 1 drop Lavender.

Method No. 3 amount: 4 drops Orange, 3 drops Clove, 3 drops Lavender.

Essential Oil Recipe No. 3: Immune System Boost

This recipe is perfect for allergies and colds. You can actually sleep when you’re sick.

Method No. 1 amount: 2 drops Eucalyptus, 2 drops Lavender, 2 drops Orange.

Method No. 2 amount: 1 drop Eucalyptus, 1 drop Lavender, 2 drops Orange.

Method No. 3 amount: 3 drops Eucalyptus, 3 drops Lavender, 4 drops Orange.

If you enjoyed this post, please like and share with your friends. If you have any questions or comments, please state your thoughts in the comment section below.

Yours Truly, The Blue Eyed Crafter


How To Draw a Maple Leaf In 2 Easy Ways!

During this pretty season, it’s not at all uncommon to want to do some sort of craftiness including the one an only, leaf. So, today, we’re going to draw the best maple leaf ever! Yes, you can do it. It’s a big fat myth that leaves are hard to draw. With this easy method that I’ve made just for you, you’ll be doodling maple leaves all day long! Are you ready to draw?

img_1203

Supplies Needed

A Pencil (for your first leaf, I recommend to use a pencil so erasing is a breeze!)

Paper (anything to write on that’s gonna be easy to erase, I find paper with lines is great because it helps make everything nice an straight!)

 Draw It!

Our first step is to draw a triangle. That’s right! A triangle! I find an acute triangle (thin) makes a better leaf. This triangle is the biggest point of your leaf, and our foundation.

img_1193

Step number two, it only gets easier with two curved triangles on either side of the big triangle. Use those lines to make the triangles on either side nice an even!

img_1194

Draw a smaller triangle on the sides of the triangles we created in step 2. Make sure they curve, Leaving a nice flat rounded bottom  of the leaf. Erase the inside lines, leaving a clean simple leaf.

img_1196

Now for the details! If you want to enlarge or straighten any parts of the leaf make sure you do so now before creating the details of the leaf. Start by very lightly drawing one not absolutely straight vein leading nearly to the top of the biggest point. Do the same thing for the other smaller points of the leaf.

img_1197

Our second step of detailing the leaf, draw very small soft slightly curved lines coming from the veins we drew in step 4. Try to match your drawing up with this picture, if you think the leaf looks off.

img_1199

Last but absolutely not least, this may be the most important step, and the easiest! Draw a line coming from the middle of the bottom of the leaf, this is the stem. If you like, make the lines of the leaf more bold.

img_1206

If you like how the leaf looks, you can keep it like this, OR you can make the small triangles slightly squiggled, leaving an uneven ridgy edge to the leaf. This gives even more detail, so you may want to do this if the leaf is the most prominent thing in the drawing or painting. Here are the difference of the two methods:

If you have any questions or comments, please leave your thoughts in the comment section below. If you enjoyed this post, please like and share with your friends. Hope you have a happy fall!

Yours Truly, the Blue Eyed Crafter

Knit Your Own: Super Simple Slouchy Hat!

If you are new to knitting, every knitter must know that the slouchy hat is essential to fall knitwear. Essential. So are you ready to knit your very own hat that will soon become your favorite? Let’s get started.

img_1177

Supplies Needed:

200 Yards of  Worsted or Aran weight Yarn (I used 100% merino an recommend you do too!)

US 8-9 Circular Knitting Needles (Loving the Addie Knit Faster ones!!)

Scissors (Used for weaving in the ends when the hat is finished)

Yarn Needle (Used for weaving in the ends once finished, you can also use a crochet hook)

9 Stitch Markers (If you don’t have any of these, tie some yarn together to make loops, or check out my super quick tutorial on how to make wire bead stitch markers!)

US 7-8 DPNs (Double Pointed Needles)

Time: this depends on how fast you knit of course, and how thick the yarn is, but it should take an estimate of 4-5 evenings

Let’s Knit

Cast on 80 stitches using the Long Tail Method, place a stitch marker, then join into the round.

Round 1: begin the first round by doing a K2 P2 (Knit two purl two) ribbing for approximately 1 1/2″ – 2″.

Next Round: Following the ribbing, continue with a stockinette stitch (simply knitting all the way around, every round) for approximately 6 1/2″ from cast on edge.

Decrease Set Up Round: Once you have reached 6 1/2″, place a stitch marker every 10 stitches, knitting.

Decrease Pattern:

Round 1 of Decrease: knit till 2 stitches before marker, k2tog (knit 2 together), slip marker, repeat.

Round 2 of Decrease: knit.

Do this repeat till it is too hard to knit, switch to DPN’s (Double Pointed Needles). Do the decrease pattern until 6 stitches remain (make sure to take off stitch markers whenever you get to k2tog each stitch). Cut yarn leaving a 6″ tail, thread yarn needle. Pull yarn through each stitch, taking off needles and pulling tight. If you would like to add a Pom Pom, do so now as well as any buttons. Weave in ends.

img_1178

An how simple was that? This is a perfect first hat, for any beginner knitter looking to get cozy this fall. If you have any questions or comments, please leave your thoughts in the comment section below. If you enjoyed this post, please like an share with your friends.

Yours Truly, The Blue Eyed Crafter


DIY: Grapefruit Coconut Oil Melt & Pour Spa Soap!

Today’s recipe is perfect for the true beginner in melt & pour soap. It takes about 10 minutes to make, and is only 3 ingredients, what could go wrong?

piccollage

Supplies Needed     Yield: 1 Bar of Soap

A Quarter Pound of White Soap Base (you can use any soap base you want as long as its white, I used Avocado Cucumber soap base to give it a subtle green tint. This recipe makes about one bar of soap, so feel free to double!)

1 tbs Coconut Oil (Just your good old Virgin coconut oil that’s hard, in a jar)

4-5 drops of Grapefruit Essential Oil (If you’re new to adding scents, don’t add too many! only a few drops is plenty)

a Sharp Kitchen Knife (this is used for cutting the soap, it should cut smoothly an easily)

Plastic or Silicone Soap Molds

a Microwave Safe Glass Measuring Cup or Bowl

a Squirt Bottle with Rubbing Alcohol (this is for popping the air bubbles in the soap)

Tip: get all the supplies together before moving on further for an even quicker and easier process!

img_1140


Let’s Start Melting & Pouring!

First things first, let’s cut the soap. Turn the soap package upside down, an lift the lid/bottom of the container off. Cut 3 of the little indented squares out with the kitchen knife, and put the three individually cut squares of soap in the bowl, into the microwave. Microwave for 20 seconds, get the soap out, and stir. If the chunks are not fully melted by stirring, pop it back in for 10 second increments stirring constantly in between until it’s absolutely liquid.


Next, take the melted soap (work quickly!! The soap will thicken VERY fast so make sure to pop it back in the microwave if it begins to harden) and add in a tablespoon of coconut oil. The hot soap should melt the coconut oil while still, stirring constantly. Now, if you have ANY subtle thickness melt it once again until it’s a liquid again before the next step.

img_1154

fullsizerender-27

Now, add in the grapefruit essential oil. Make sure to sniff whatever you’re putting into the soap before adding it in. Grapefruit essential oil has great properties! It keeps you focused, awake, and can increase happiness. Only add about 4-5 drops, depending on how strong you want the fragrance to be.

fullsizerender-28

Fourth and nearly final, pour the soap into the soap molds. Now spritz the soap with rubbing alcohol to pop all the air bubbles. This recipe makes about one bar of soap, because all the recipes that I’ve looked at makes pounds an pounds of soap, and I just didn’t really know if I was going to like the soap that much and would end up quartering and quartering those recipes. It’s always a good idea to make one bar, see if you like it, then make a lot.

fullsizerender-31

Fifth and final, after about 30 minutes to an hour depending on humidity, pop the fully hardened soap out of the mold. Silicone molds will be easier to remove soap from then plastic molds, so keep this in mind while shopping for soap supplies. Voila!! This is a very gentle soap, so feel free to use it on your face. It’s excellent to have at the kitchen sink as well.

img_1160

img_1163

If you enjoyed this post, please like and share with your friends! If you have any questions or comments, please leave your thoughts in the comment section below.

Yours Truly, The Blue Eyed Crafter

A Guide to Beginner’s Acrylic Painting Part 2: Paint!

So now that we’ve covered brushes, now let’s cover paint on those brushes. Today the basics of paint, from cheap to expensive, I will show you what’s worth it an whats not.  Let’s begin with the grades.

What’s The Difference Between Student Grade and Artist Grade?

This is a very frequently asked question in the paint world, so let’s get our facts straight. Student grade is what the very beginner would use. It’s cheap, and less high quality, yes, but let’s face it. Your first painting is going to be no Mona Lisa. So wouldn’t it make sense that you work up to the dollar signs?

That’s where artist grade comes in. Artist grade is the true, expensive, high quality stuff the professionals use.

What Does Light Fast Mean?

Light fast is something quite important, that all beginners should know the basics of. Basically, light fast is the difference between red roses that turn into white roses a few years later due to the sun, or red roses that stay red. No painting should be placed directly into the sun, due to this fact. Student grade paint is less light fast (more common to make red roses white in the sun) and artist grade is more light fast (less common to make red roses turn white in the sun) you shouldn’t have to worry too much about this, because if you keep painting your favorite will turn into your least favorite and what used to be on the walls won’t be on the walls in a few years most likely. However, this is important, and not to be ignored. So, don’t buy the cheapest of the cheap, which in a few minutes I will get to the best brands to buy… But until then, just keep this in mind when hanging up those beautiful paintings, and next time that tube of paint runs out.

What Paint Should I Buy?

Liquitex is a pretty trusting brand. They do have a line of student grade paint that is perfect for beginners called Liquitex Basics. This is great if you’ve just picked up your first brush, and want to try out this media. It’s also nice to get familiar with artist grade shades, and color names, which we will get to in another post. Craft paint, like Apple Barrel, or Ceramcoat, is nice for paper projects, that won’t be hung up, and just some simple practice. Although you may get confused about colors, since they have all those weird names that are similar to house painting names.

If you are ready to get into the artist grade stuff, brands like Liquitex, Matisse, and Golden are an option. Liquitex Heavy Body is great for your first artist grade paint. Matisse and Golden are dipping more into the pricey side, but are also very nice and quite high quality paint. Matisse is an Australian company, and Golden is USA manufactured. Don’t be worried about trying all those different brands, that’s a good idea! Trying different brands an different colors, and branching out of things you might be a little comfortable with, is great because you’re making yourself a better painter, seeing if you might like something else a little more.

What Are “The Medias”?

Well, there are many medias, but the most basic ones are Acrylic, Oil, and Watercolor. These are three different types of painting, and completely different to each other. Acrylic is the one we’re learning about, a quick drying paint that carries many techniques an methods, including wet on wet, and others. Another thing to know about acrylic painting is it cannot be wet down more than 20%, the exception to this rule being that you can wet it down as much as you like if you are on an absorbing surface such as paper, or wood. Acrylic brushes include synthetic brushes,  and are relatively fairly firm, depending on the artist’s preference.

Oil painting is another type of painting, that has more colors than acrylic, and dries very very slowly. You have to wash your brushes with oil instead of water, like acrylic.  A painting takes several weeks just to dry, especially with cold weather. With oil painting you’re likely to get a texture with the paint. Oil and acrylic can be used together, although you must be very careful when doing this. Oil can be covered onto acrylic but acrylic cannot be covered onto oil. Oil painting brushes include hog hair bristles and are relatively rougher. Last but certainly not least, we have watercolor.

Watercolor painting is relatively new to the world, this meaning you won’t see watercolor paintings in many museums. There are many of the same colors in watercolor as there are in acrylic, and the cool thing about watercolor painting is that the paint can be reactivated with water, meaning once the paint is dry put a wet brush on and you have paint again. This cannot be achieved by acrylic or oil. The  bad thing about watercolor is that you have to have an absorbent surface, such as watercolor paper. Therefore you cannot hang watercolor paintings as easily. Watercolor brushes are softer and include natural hair brushes, so they absorb more water.

If you enjoyed this post, please like and share with your friends. If you have any questions or comments, please state your thoughts in the comment section below.

Yours Truly, The Blue Eyed Crafter